Thursday, April 18, 2013

Black-Eyed Peas Saute with Rice


This was our dinner tonight- an experiment in "What's in the Pantry?" It turned out delicious! This recipe is for the black-eyed pea saute, and you can put it over any grain you like- white, brown, or wild rice, quinoa, barley. etc. Here I had it over white rice mixed with red quinoa. Adding quinoa is a great way to use up white rice if you're switching from refined to whole grains. It cooks at the same liquid-to-grain ratio and for the same amount of time. I like red quinoa because it is a little less bitter than white. You can do this gradual phase out with white and wheat flour when you bake. Start with half and half, then increase the ratio of wheat to white and eventually you're eating 100% whole wheat! It also helps get your palate used to the flavor of quinoa and other whole grains to mix it, a little at first, then more and more until you're just eating whole grains. Get on the health train, people!


Here's the recipe...

1/2 cup dried black-eyed peas (or a can of them, but dried is cheaper and healthier and tastier!)
3 Cups chicken or vegetable broth
2-3 cups water
1/2 to 1 tbs salt (you can add more but you can't take it out!)

1/2 cup white rice and 1/2 cup red quinoa
2 cups water

1/2-1 oz bacon, diced (optional- if you don't use bacon you might want some liquid smoke or smoked paprika for flavor)

1 tbs butter (optional- if you want you can saute the veggies in the bacon grease, or just use a dab of olive oil or some cooking spray. even a thin layer of water works well as long as you don't let it get too dry)

1/2 med onion, any color
1 bell pepper, any color
2-3 stalks of celery

Dash of hot sauce (optional. You can also add a dash of cruches red pepper flakes or chili powder if you don't have hot sauce)

1. Start cooking the rice and the black eyed peas at the same time. If you use brown rice, start it first, it takes about 45 minutes.

  • Peas: add peas, salt, broth, and water to a medium saucepan and simmer partially covered for about 30 minutes. after about 20, add 1/2 the bacon to the pot to flavor the beans. The peas are done when you can easily mash one with a fork and it is soft and tender
  • Rice: cook according to package directions. White rice and quinoa are 2 parts liquid to 1 part grain. You can use broth here as well instead of water, but the saute mix is very flavorful and doesn't need any help from the rice.
2. While the rice and peas are cooking, dice your veggies. Heat a skillet on med high and melt the butter in the pan. Add the other half of the bacon and cook for about a minute. Reduce heat to medium and add veggies. Saute them until they are tender but still have a nice crisp texture. You don't want soggy veggies! Remove from heat.

3.  Once the peas are done, drain them, reserving some of the liquid, and add them to the skillet. Saute over medium heat for a couple minutes, adding bean liquid as needed to keep the mixture from sticking to the pan (about a tbs or two), until heated through and well combined. Add a dash of hot sauce at the end for a little kick.

4.  Serve over warm rice. It would also be good on its own! Enjoy!


Easy Homemade Dinner and Cinnamon Rolls


A lovely friend of mine shared this roll recipe with us at a "What's For Dinner?" Cooking club meeting in my ward. It is really easy, especially because you mix the dry ingredients ahead of time and keep them in your pantry for whenever you might feel like making rolls!

Also,

THEY ARE THE BEST ROLLS I HAVE EVER TASTED.

Here it is:

 Roll Mix:

5 lb of flour (about 17 Cups) Either white, whole wheat, or a combination of the two.
1 C Sugar
1 C Powdered Milk (the secret ingredient, I think!)
4 tsp Salt.

Wet Ingredients:

1 1/2 C Hot Tap Water
1 Tbsp Yeast
1 Tbsp Sugar

2 Eggs
1/2 Cup Oil


1. In the bowl of your stand mixer (or just a large mixing bowl if you don't have a mixer), add yeast and sugar to water. stir to combine. 


 Allow to sit for a few minutes until it looks foamy like this.
Add eggs and oil. Mix well.


It's a good idea to break your eggs into a cup, then pour them into the bowl. This helps you avoid shells or rotten eggs in your food.

Mixture should be well combined- I like to do it until it's foamy.

2. Continue mixing the wet ingredients with the dough hook attached to your mixer, add roll mix one cup at a time, up to 6 cups. You will be able to tell when you've added enough when the dough starts to clean the sides of the bowl. If you need more than six cups, just add 1-2 tablespoons at a time. The dough will still feel a little sticky and very soft to the touch. That's good! Don't add more flour, or your rolls will be dense and heavy. If you're not using a mixer, add the flour while stirring with either a rubber spatula or wooden spoon. When the dough is still soft and sticks to your fingers just a little (not ooey-gooey, but stringy and moist), you're done.
This dough (with 5 1/4 cups roll mix) is ALMOST cleaning the sides, so I added a tbs of flour, and got...

This! Much better.

3. Cover your bowl (I like to use a shower cap...not a used one! one I save specifically for bread making :) you can also use plastic wrap or a damp towel ) and allow to rise until it is double in size. (about 45 minutes)

4. Form your rolls (there is a great resource here for fun-shaped rolls) and place the rolls in a pan prepared with cooking spray or greased with soft or melted butter. Little tip: spreading or dipping the roll dough pieces (before baking) in melted butter will make them extra succulent when they come out of the oven!
Divide in half- I am divide the other half in half too, to make 3/4 batch of regular rolls and a 1/4 batch of cinnamon rolls


Roll out dough in a circle


Spread Butter

Cut, I like to do 1/4s, 1/8s, then each 1/8 piece into either 2 or 3 pieces depending how big they are.


Roll from the wide end to the skinny end, place in pan

Cover and let rise. I use a piece of plastic wrap that is sprayed with some  cooking spray


5. Allow the rolls to rise for about 30-45 minutes or they've obviously grown. They'll also rise a bit in the oven.  Don't let them rise too much or they'll collapse and look terrible. (not as tasty that way either.) You can add an egg wash here if you want to be extra fancy. Beat an egg well and brush it lightly over the top of the rolls right before putting them into the oven. It'll give them a really nice golden crust on top.

6. Bake at 400* 12-14 minutes, or until golden around the bottoms. A little tip I learned is to take the temperature of the center roll with a food thermometer. Between 170-200* is perfectly done bread! Combine the temp with the coloring (golden brown around bottom edges and light golden on top) for a good bake.

Allow the rolls to cool a little and serve! 

This recipe also makes great cinnamon rolls. I often split it in half and make a pan of dinner rolls and a pan of cinnamon rolls. 

For Cinnamon Rolls:

1. Start with a log shape of dough ball. Roll the dough out in a flat rectangular shape.

2. Spread with melted butter, then sprinkle with a mixture of 1/4 cup brown sugar and 1-3 teaspoons of cinnamon, depending on your cinnamon and how cinnamon-y you want it. This Saigon Cinnamon was stronger than I thought, and they turned out a bit too cinnamony for me!


3. Roll into a spiral shape, rolling from the LONG SIDE of the rectangle (if you roll from the short side you'll get only a few really fat rolls :)
4. Cut into about 1 1/2 inch sections using string or dental floss by sliding the middle of the piece of string under the end of the long roll about 1 1/2 inch, then crossing the ends of the string and pulling tight. Repeat until the dough has all been cut.


5. Place in a greased/sprayed pan (I like to smash them down a bit before covering), cover and allow to rise. Follow baking directions for the dinner roll recipe.
6. Cover with your favorite glaze or frosting! 
7. Optional: Add raisins, craisins, chocolate chips, bits of apple, or anything else that sounds tasty before you roll up the roll dough!

My Favorite Glazes:

Cream Cheese Cinnamon Roll Glaze

3 C Powdered or 1 C Granulated Sugar
1/2 package of Cream Cheese, softened in the microwave or left out to reach room temperature
1 1/2 tsp Vanilla Extract
2-3 tbs Milk

Cream together sugar and cream cheese until very smooth. Add vanilla. Add milk 1 tbs at a time until it reaches the desired consistency. Yum!


Raw Sugar Caramel Glaze:

1/4 C Butter, softened
1/3 Cup Raw Sugar
1/3 Cup Granulated White Sugar
2-3 Tbs Milk
1 Tsp Vanilla

Cream all ingredients in the mixer. It will look curdled and strange. Put into a small sauce pan and cook over medium heat, stirring constantly until there is no more gritty sugar on the bottom (you'll be able to feel it) and it starts to bubble a bit. Remove from heat immediately. As it cools it will thicken slightly.

Enjoy!

Wednesday, April 17, 2013

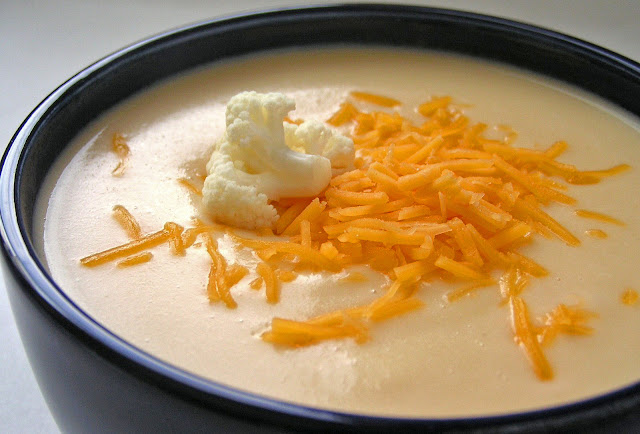
Zupa's Wisconsin Cauliflower Soup Copycat

Photo credit: www.butterwithasideofbread.com


I made this Wisconsin Cauliflower (Zupas Style) Soup the other day. Sorry, I didn't take any photos for the simple expedient that my kitchen was a mess.. :) It was really easy and SOO yummy. I adapted the recipe from one found here

INGREDIENTS
  • 3 Tbsp. butter
  • 1 medium onion chopped
  • 1/4 cup whole wheat flour
  • 1/2 tsp. salt
  • 1 1/2 cup milk
  • 1 1/2 cups water
  • 1 (14.5 oz) can chicken broth
  • 2.5 lbs cauliflower (one head)
  • 1 tsp. Dijon Mustard (optional)
  • 1 1/2 cups sharp cheddar cheese shredded
  • 1/2 cup pepper jack cheese shredded **don't have pepper jack? use mozzarella or monterey jack and add a few dashes of hot sauce!**               
INSTRUCTIONS       
  1. Melt butter and chopped onion together in a large sauce pan and sauté for approximately 10 minutes over medium heat until onion gets golden in color.
  2. Add flour and stir to make a roux. Heat while stirring for a couple of minutes.
  3. Slowly add the milk. Gradually add and stir the entire time. Following the milk, gradually add water and chicken broth and stir constantly.
  4. Add chopped cauliflower and heat until boiling.
  5. Reduce heat and simmer, covered, until cauliflower is tender. This will take approximately 15 minutes.
  6. Place contents of sauce pan into blender and blend until smooth. Remove center part of blender cover to allow steam to escape.
  7. Return cauliflower mixture to saucepan; heat over medium heat until hot, stirring occasionally. Add the salt! Remove saucepan from heat; stir in mustard and cheese until melted and smooth.
  8. Serve soup topped with a little cheese for garnish.
So easy and very yummy. The original recipe is a little thicker and creamier than mine, but I didn't have 1/2 and 1/2 or pepper jack, so mine was a bit thinner, but still delish! Enjoy!

Friday, April 12, 2013

The Creation Quiet Book- Days 1 & 2

Evan is getting bored with people watching at church, so I have started making a quiet book for him. There will be more to follow in the coming months because I don't want any of them to get boring for him. Variety, people!

The Creation is my first idea, which will be followed by Book of Mormon Stories, Stories of Jesus, Old Testament Stories, and Primary Songs/Gospel Principles. 

It has been a blast thinking of creative pages and learning to work with felt!

Day One: Organize a World

Activities:

Earth puzzle- kids can use either the blue or green side of the puzzle pieces and create the world however they like. Puzzle pieces are attached by magnet. 
Solar System- three planets on the opposite page are removable so kids can put them in whatever spot they want. Also magnetic.


Day Two: Separate Light and Darkness

Activity: Find all the lights in the darkness. Sun is reversible with black on the back, moon has a pivoting cover (where the title is), stars are covered by black hidey-flaps. 

I haven't finished this page yet (I need some black thread first and haven't made a trip to the store yet), it needs to be sewn together. I hot glued many of the parts but will stitch over them too to avoid choking hazards.
Day Two Start position (before title was added)

Sun-Dried Tomato Humus


Ingredients:

1 can garbanzo beans (chickpeas) or about 1 1/3 cups of home-cooked ones, drained. Reserve some of the liquid.

1-2 tbs Olive Oil

1-2 tbs Lemon Juice

1 tbs sun dried tomatoes (re-hydrated or from a can)

1-2 cloves (1/2 tsp) minced garlic

1 tbs green chiles or a dash of hot sauce (optional)


Directions:

Combine all ingredients in a blender or food processor until smooth.

If it is too thick, add bean liquid (or water) by the 1/2 tsp until dip is the desired consistency.

Serve with carrot sticks, pita bread, pita or tortilla chips, crackers, or anything else you can think of!